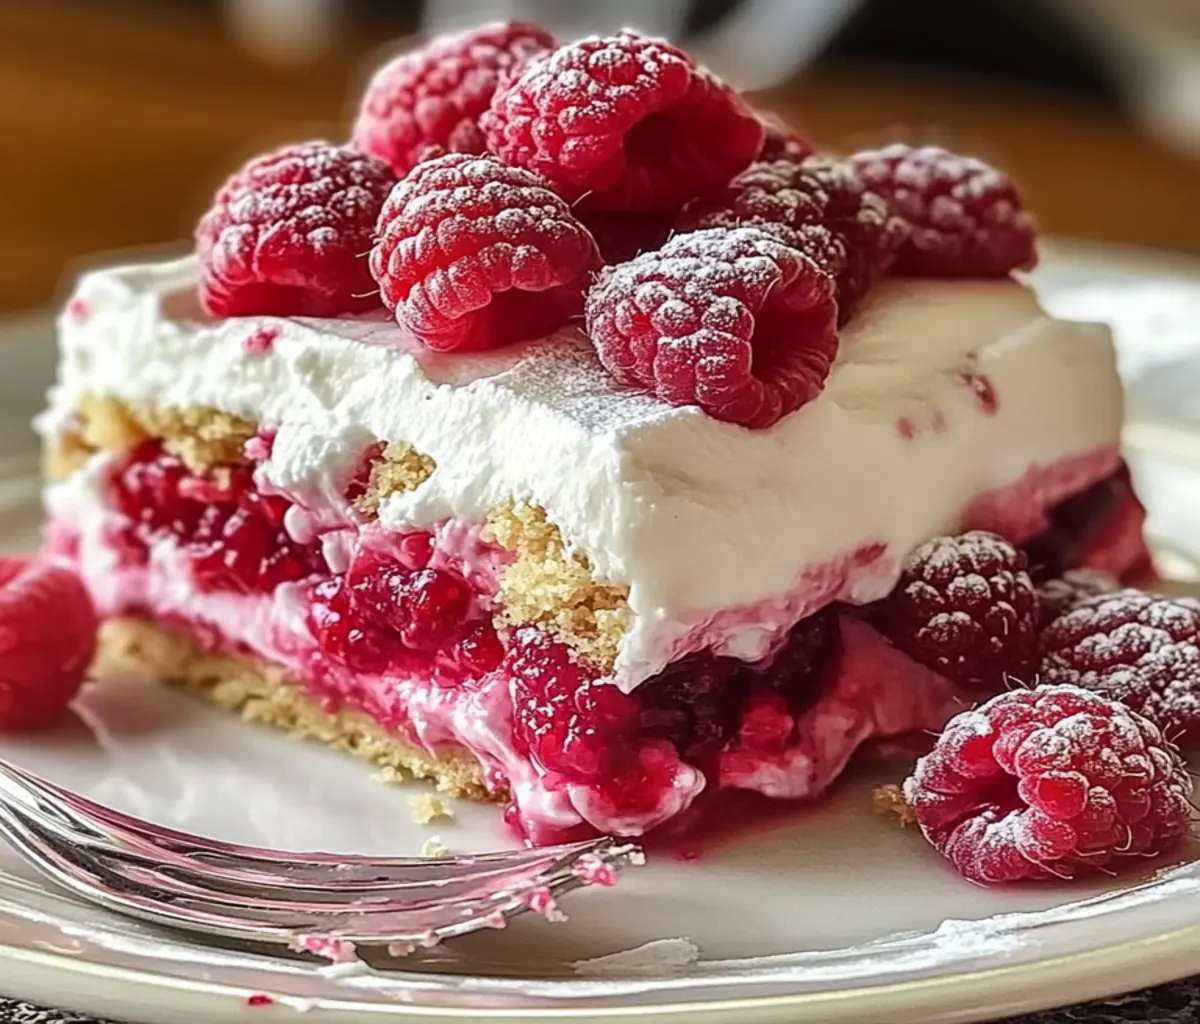
Introduction
No-bake desserts are a game-changer, especially when you crave something sweet but don’t want to turn on the oven. This No-Bake Raspberry Split Cake is a delightful combination of a buttery biscuit crust, creamy filling, and tangy raspberry topping—making it the perfect treat for any occasion.
Whether you’re hosting a party, celebrating a special moment, or simply indulging in a homemade dessert, this cake is sure to impress. Plus, it’s super easy to make, requiring just a handful of ingredients and minimal effort. If you love fruity, refreshing, and creamy desserts, this recipe will quickly become one of your favorites!
Let’s dive into why you’ll love this delicious no-bake cake.
Why You’ll Love This No-Bake Raspberry Split Cake
This No-Bake Raspberry Split Cake is more than just a dessert—it’s a perfect balance of flavors and textures. Here’s why you’ll love making (and eating!) this cake:
1. No Oven Required
Forget about preheating the oven or worrying about baking times. This cake sets beautifully in the fridge, making it ideal for warm weather or when you need a quick dessert.
2. Easy to Make No-Bake Raspberry Split Cake
With simple ingredients and straightforward steps, this recipe is beginner-friendly. Whether you’re a seasoned baker or a first-timer, you can master this cake with ease.
3. Bursting with Raspberry Flavor
The combination of fresh or frozen raspberries with a creamy filling creates a deliciously tangy and sweet contrast that’s simply irresistible.
4. Perfect for Any Occasion
Whether it’s a family gathering, a potluck, or just a treat for yourself, this cake is always a crowd-pleaser.
5. Customizable
Want to switch things up? You can easily modify this recipe by adding different fruits, using a flavored crust, or even making it vegan-friendly.
Ingredients Needed No-Bake Raspberry Split Cake
Gather all your ingredients before starting this delicious No-Bake Raspberry Split Cake. Using fresh, high-quality components will enhance both flavor and texture. Here’s what you’ll need:
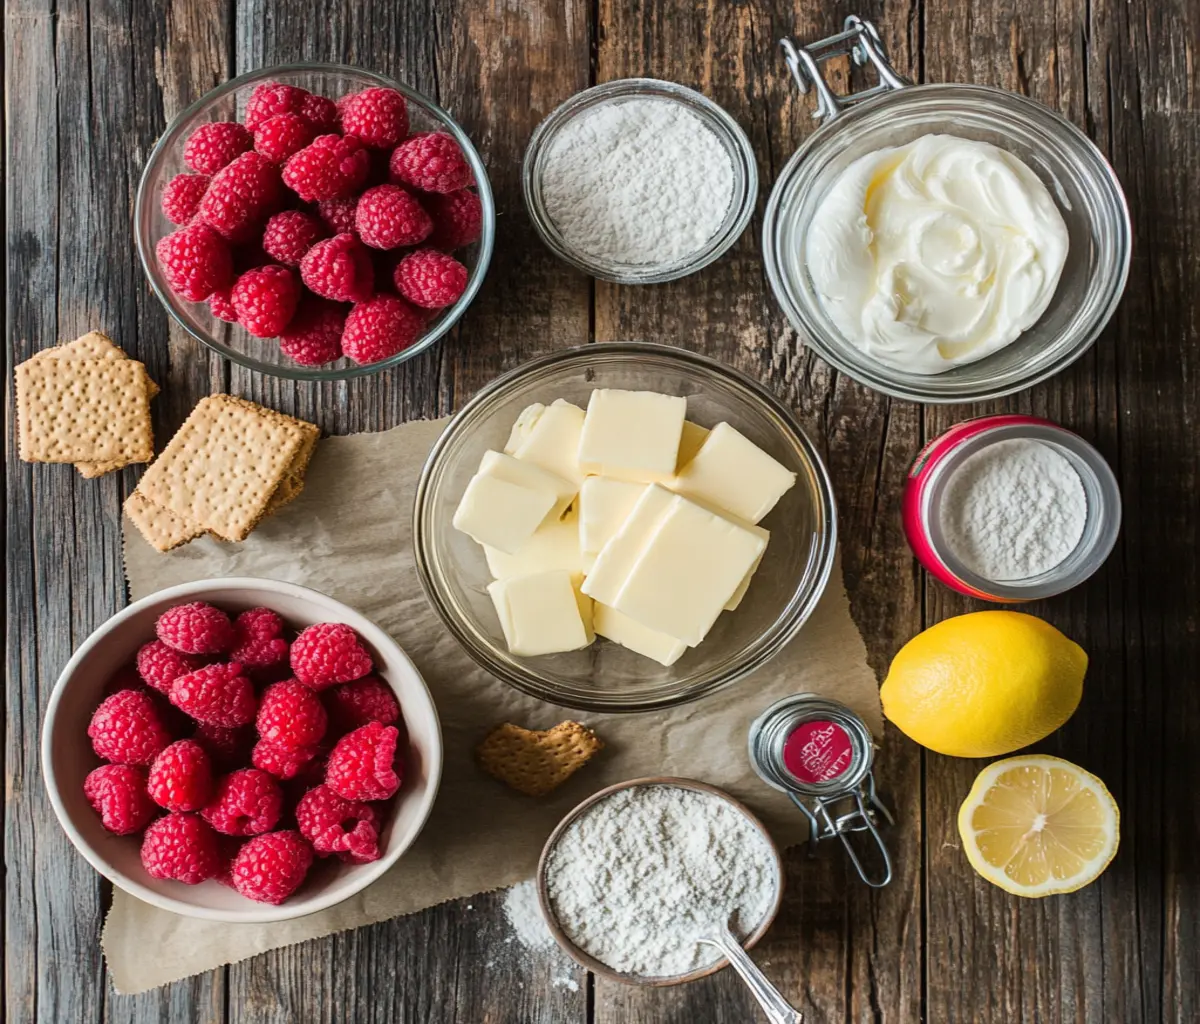
Crust Ingredients:
- 2 cups (200g) crushed graham crackers or digestive biscuits
- ½ cup (115g) unsalted butter, melted
- 2 tablespoons sugar (optional, for extra sweetness)
Creamy Filling Components:
- 8 oz (225g) cream cheese, softened
- 1 cup (240ml) heavy whipping cream
- ½ cup (100g) powdered sugar
- 1 teaspoon vanilla extract
- 1 tablespoon lemon juice (adds a fresh, tangy flavor)
Raspberry Topping Essentials:
- 2 cups (250g) fresh or frozen raspberries
- ¼ cup (50g) sugar
- 1 tablespoon cornstarch
- 2 tablespoons water
- 1 teaspoon lemon juice
Optional Garnishes:
- Fresh raspberries
- Whipped cream
- White or dark chocolate shavings
- Mint leaves
Kitchen Tools You’ll Need to No-Bake Raspberry Split Cake
To make this No-Bake Raspberry Split Cake smoothly, you’ll need a few essential kitchen tools:
1. Mixing Bowls
You’ll need at least two mixing bowls—one for the crust and another for the creamy filling.
2. Food Processor or Rolling Pin
If using whole graham crackers or biscuits, a food processor makes crushing them easier. Alternatively, place them in a ziplock bag and crush them with a rolling pin.
3. Springform Pan (8 or 9 inches)
A springform pan is ideal for easy cake removal, but a regular cake pan can work with parchment paper for lifting.
4. Hand Mixer or Stand Mixer
A mixer helps achieve a smooth, creamy filling and fluffy whipped cream.
5. Saucepan
Needed for making the raspberry topping by cooking down the fruit.
6. Rubber Spatula & Whisk
A spatula helps spread layers evenly, and a whisk is useful for mixing ingredients.
7. Measuring Cups & Spoons
For accurate measurements of ingredients.
8. Refrigerator
Since this is a no-bake cake, chilling is essential for setting the layers properly.
Step-by-Step Instructions No-Bake Raspberry Split Cake
This recipe is divided into four simple steps: preparing the crust, making the raspberry filling, assembling the cake, and chilling it to perfection.
1. Preparing the Crust
The crust is the foundation of the cake, giving it a crunchy texture that pairs perfectly with the creamy filling.
Instructions:
- Crush the biscuits: Use a food processor or place the crackers/biscuits in a sealed ziplock bag and crush them with a rolling pin until fine crumbs form.
- Mix with melted butter: In a mixing bowl, combine the crushed biscuits with melted butter and sugar (if using). Stir until the crumbs are evenly coated.
- Press into the pan: Transfer the mixture into a springform pan. Use a spoon or the bottom of a glass to press it firmly into an even layer.
- Chill the crust: Place the pan in the refrigerator for at least 15-20 minutes to set while preparing the filling.
2. Making the Raspberry Filling
The raspberry filling adds a deliciously tangy and fruity layer to the cake. It’s simple to make and enhances the overall flavor.
Instructions:
- Cook the raspberries: In a saucepan over medium heat, add the raspberries, sugar, and lemon juice. Stir occasionally until the raspberries break down and release their juices (about 5 minutes).
- Thicken the mixture: In a small bowl, mix the cornstarch with 2 tablespoons of water to create a slurry. Slowly pour this into the raspberry mixture while stirring constantly.
- Simmer and cool: Let the mixture simmer for another 2-3 minutes until it thickens slightly. Remove from heat and allow it to cool completely before using.
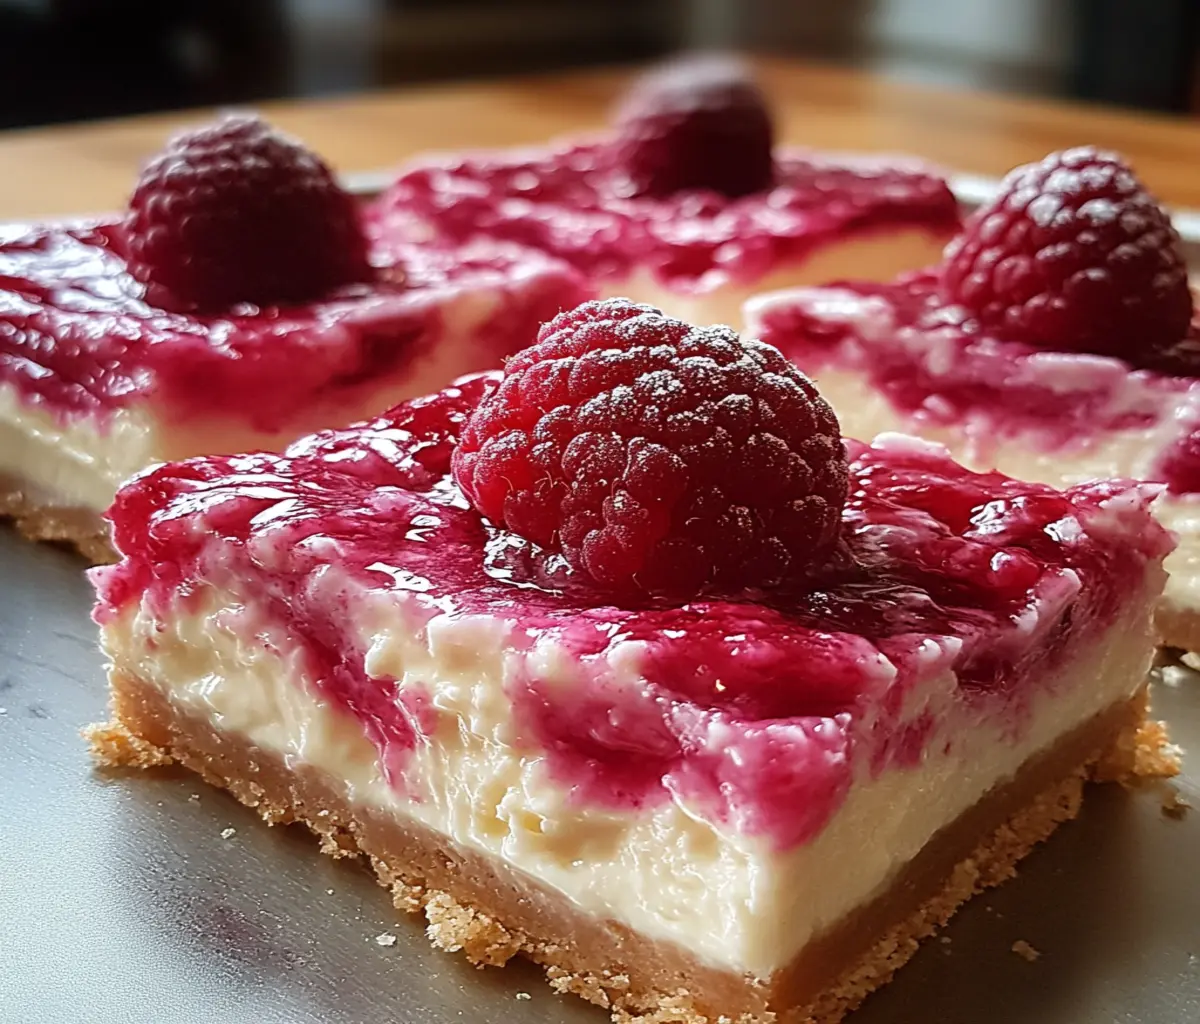
3. Assembling the Cake “No-Bake Raspberry Split Cake”
Now that the crust and raspberry filling are ready, it’s time to layer everything together!
Instructions:
- Make the creamy filling: In a mixing bowl, beat the softened cream cheese, powdered sugar, and vanilla extract until smooth and creamy.
- Whip the cream: In a separate bowl, whip the heavy cream until stiff peaks form. Then, gently fold it into the cream cheese mixture to create a light and fluffy filling.
- Spread the filling: Remove the chilled crust from the fridge and spread the creamy filling evenly over it using a spatula.
- Add the raspberry topping: Gently spoon the cooled raspberry filling over the cream layer, spreading it evenly.
- Smooth the top: Use the back of a spoon or an offset spatula to create an even raspberry layer.
4. Chilling and Serving “No-Bake Raspberry Split Cake”
To ensure the perfect texture and flavor, the cake needs time to set properly.
Instructions:
- Chill the cake: Cover the pan with plastic wrap or aluminum foil and place it in the refrigerator for at least 4 hours (or overnight for the best results). This allows the layers to firm up.
- Remove from the pan: Once fully set, carefully release the cake from the springform pan. If using a regular cake pan, gently lift the cake using parchment paper.
- Add final touches: Garnish with fresh raspberries, whipped cream, mint leaves, or chocolate shavings for an extra-special presentation.
- Slice and enjoy! Use a sharp knife to slice the cake, wiping the blade between cuts for clean slices. Serve chilled and enjoy the creamy, fruity goodness!
Tips for the Perfect No-Bake Raspberry Split Cake
Making a No-Bake Raspberry Split Cake may be simple, but a few key techniques can elevate it from good to absolutely amazing. Follow these tips to ensure the best texture, flavor, and presentation.
1. Use Fresh, Ripe Raspberries
The raspberries are the star of this dessert, so their quality matters. Here’s how to pick the best ones:
- Choose bright red, plump raspberries that are firm to the touch.
- Avoid any soft, mushy, or moldy berries as they can affect the texture.
- If using frozen raspberries, thaw them completely and pat them dry with a paper towel to remove excess moisture.
If raspberries aren’t in season, you can also use freeze-dried raspberries crushed into a powder to mix into the filling for flavor without extra liquid.
2. Choose the Right Base for a Firm Crust “”
A well-structured crust is essential for supporting the creamy filling. Follow these tips:
- Use finely crushed biscuits (graham crackers, digestive biscuits, or vanilla wafers) for a smooth base.
- Mix with melted butter in the right ratio—too little butter and the crust won’t hold together; too much and it’ll be greasy.
- Press the crust firmly into the pan using the back of a spoon or the bottom of a measuring cup to create an even layer.
- Chill the crust in the fridge for at least 30 minutes before adding the filling to help it firm up.
3. Achieve the Perfect Creamy Filling “No-Bake Raspberry Split Cake”
The filling should be light, airy, and stable. Here’s how to get it just right:
- Use cold heavy cream and beat it until stiff peaks form. This ensures the filling holds its shape when sliced.
- Soften cream cheese at room temperature before mixing to avoid lumps. Beat it well before adding other ingredients.
- If the filling feels too soft, chill it for 15–20 minutes before spreading it over the crust.
4. Let the Cake Chill for the Right Amount of Time
Since this is a no-bake dessert, chilling is crucial for setting the layers.
- Refrigerate the cake for at least 4–6 hours, but overnight is ideal for a firmer texture.
- If you’re in a rush, place it in the freezer for 1 hour before serving, but don’t leave it too long, or it will freeze solid.
5. Balance the Sweetness to Match the Raspberries
Raspberries have a tart flavor, so the right level of sweetness is key.
- Taste the filling before assembling the cake. If it’s too tangy, add a little more powdered sugar or honey.
- Consider using white chocolate chips or a drizzle of condensed milk in the filling for extra sweetness.
- If you like a contrast, keep the filling slightly tart and balance it with a sweeter crust or a light chocolate drizzle on top.
6. Add the Right Garnish for a Beautiful Presentation
A well-decorated cake is even more tempting! Here are some ideas:
- Fresh raspberries and mint leaves for a simple, elegant look.
- White or dark chocolate shavings for extra decadence.
- A raspberry sauce drizzle or a dusting of powdered sugar for a gourmet touch.
- Chopped nuts (like almonds or pistachios) for added crunch and flavor contrast.
Variations and Substitutions
One of the best things about a No-Bake Raspberry Split Cake is its versatility. You can tweak the ingredients to suit different tastes, dietary needs, or ingredient availability.
1. Swap the Crust
Instead of a graham cracker crust, try:
- Oreo crust for a chocolatey twist
- Almond flour and butter for a gluten-free option
- Shortbread cookies for a richer flavor
2. Change Up the Fruit
Raspberries are delicious, but you can swap them for:
- Strawberries for a sweeter flavor
- Blueberries for a mild, juicy bite
- Mixed berries for a colorful, flavorful combo
3. Make It Dairy-Free “No-Bake Raspberry Split Cake”
- Use coconut cream instead of heavy cream
- Swap cream cheese for a dairy-free alternative
- Opt for vegan butter in the crust
4. Adjust the Sweetness
If you prefer a lower-sugar dessert:
- Use honey or maple syrup instead of sugar
- Choose dark chocolate for a less sweet topping
- Reduce or omit extra sweeteners in the filling
5. Add a Crunchy Element
For extra texture, mix chopped nuts (almonds, pecans) or crushed cookies into the filling or sprinkle them on top.
Common Mistakes to Avoid No-Bake Raspberry Split Cake
Even though this No-Bake Raspberry Split Cake is simple to make, a few common mistakes can affect the final result. Here’s what to watch out for:
1. Not Pressing the Crust Firmly Enough
A loose crust can crumble when slicing the cake. Use the back of a spoon or a flat-bottomed glass to press it down firmly so it holds together.
2. Using Warm Ingredients
If your cream cheese or whipped cream is too warm, the filling may turn runny. Always use chilled ingredients for the best texture.
3. Overmixing the Whipped Cream
Whipping the cream too much can make it grainy or even turn it into butter. Stop whipping as soon as stiff peaks form.
4. Not Letting the Cake Set Properly
It’s tempting to slice the cake early, but rushing the chilling time can cause a messy, unstable dessert. Let it chill for at least 4–6 hours (overnight is even better!).
5. Adding Too Many Raspberries
While raspberries add great flavor, too many can make the filling watery. Stick to the recommended amount and drain frozen raspberries well before using.
6. Cutting the Cake “No-Bake Raspberry Split Cake” Too Soon
For clean slices, use a sharp knife, wipe it between cuts, and let the cake sit at room temperature for a few minutes before slicing.
Health Benefits of Raspberries in Your No-Bake Raspberry Split Cake
Not only is this No-Bake Raspberry Split Cake a delicious treat, but it also offers some surprising health benefits—thanks to its star ingredient: raspberries! These vibrant berries are packed with nutrients that make indulging a little more guilt-free.
1. Rich in Antioxidants
Raspberries are loaded with antioxidants like vitamin C and quercetin, which help combat oxidative stress and may reduce the risk of chronic diseases.
2. High in Fiber for Better Digestion
Just one cup of raspberries contains around 8 grams of fiber, which supports healthy digestion, regulates blood sugar levels, and keeps you feeling full longer.
3. Supports Heart Health
The polyphenols and potassium in raspberries contribute to heart health by lowering blood pressure and reducing the risk of heart disease.
4. Low in Calories, Big on Flavor
If you’re looking for a dessert that’s naturally low in calories but still bursting with flavor, raspberries are a perfect choice. Their natural tartness enhances the cake’s taste without the need for excessive sugar.
5. A Natural Immune Booster
Thanks to their high vitamin C content, raspberries help strengthen the immune system, making this dessert a little bonus for your overall health.
6. May Help with Weight Management
The fiber and low-calorie content of raspberries make them an excellent addition to a balanced diet. They promote satiety, which may help with weight management when enjoyed in moderation.
7. Great for Skin Health
The antioxidants and vitamin C in raspberries help combat skin aging by promoting collagen production and protecting against environmental damage.
How to Maximize the Health Benefits in Your No-Bake Raspberry Split Cake
To keep this dessert as nutritious as possible, try these tips:
- Use fresh raspberries instead of sugar-laden canned ones.
- Opt for a whole-grain or nut-based crust for extra fiber.
- Use Greek yogurt or light cream cheese for a lower-fat, protein-rich filling.
- Sweeten naturally with honey, maple syrup, or stevia instead of refined sugar.
This way, you can enjoy your No-Bake Raspberry Split Cake while still reaping the benefits of its nutritious ingredients!
Frequently Asked Questions (FAQs)
1. Can I make this No-Bake Raspberry Split Cake ahead of time?
Yes! This cake is perfect for making ahead. Prepare it a day in advance and let it chill overnight for the best texture and flavor.
2. Can I use frozen raspberries instead of fresh ones?
Absolutely! Just make sure to thaw and drain them well to prevent excess moisture from making the filling runny.
3. How long does this cake “No-Bake Raspberry Split Cake ” last in the fridge?
It stays fresh for 3–4 days when stored in an airtight container in the refrigerator.
4. Can I freeze this No-Bake Raspberry Split Cake?
Yes! Wrap it tightly in plastic wrap and store it in the freezer for up to 1 month. Let it thaw in the fridge before serving.
5. What can I use instead of cream cheese in No-Bake Raspberry Split Cake?
If you don’t like or can’t have cream cheese, try using:
- Greek yogurt for a tangy alternative
- Mascarpone cheese for a richer taste
- Vegan cream cheese for a dairy-free option
6. How do I prevent the crust from crumbling “No-Bake Raspberry Split Cake”?
Make sure to:
- Use enough melted butter to bind the crumbs
- Press the crust firmly into the pan
- Chill it for at least 30 minutes before adding the filling
7. Can I add chocolate to No-Bake Raspberry Split Cake?
Definitely! Try:
- A drizzle of melted chocolate on top
- Chocolate shavings as a garnish
- A chocolate cookie crust instead of graham crackers.
Conclusion
The No-Bake Raspberry Split Cake is a perfect dessert for any occasion. It’s easy to make, requires no oven time, and delivers a creamy, fruity, and refreshing treat. Whether you stick to the classic recipe or experiment with variations, this cake is sure to impress.
By following the tips and avoiding common mistakes, you’ll achieve a smooth, well-set, and flavorful cake every time. Plus, with options for substitutions, you can easily customize it to fit different dietary needs.
So why not give it a try? Gather your ingredients, whip up this effortless dessert, and enjoy every creamy, berry-filled bite!
Print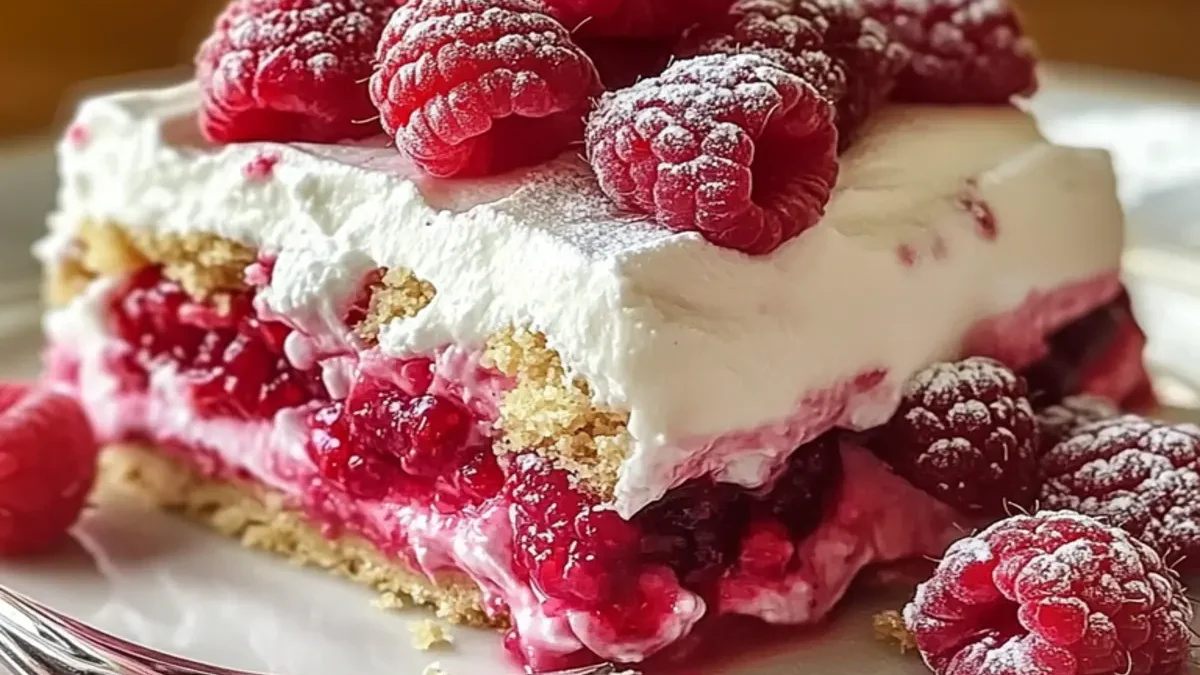
No-Bake Raspberry Split Cake
- Total Time: 4 hours 25 minutes (including chilling time)
- Yield: 8–10 servings 1x
Description
A creamy, fruity, and refreshing No-Bake Raspberry Split Cake that requires no oven! This easy-to-make dessert features a buttery biscuit crust, a luscious cream filling, and a tangy raspberry topping—perfect for any occasion.
Ingredients
For the Crust:
- 2 cups (200g) crushed graham crackers or digestive biscuits
- ½ cup (115g) unsalted butter, melted
- 2 tablespoons sugar (optional, for extra sweetness)
For the Creamy Filling:
- 8 oz (225g) cream cheese, softened
- 1 cup (240ml) heavy whipping cream
- ½ cup (100g) powdered sugar
- 1 teaspoon vanilla extract
- 1 tablespoon lemon juice (adds a fresh, tangy flavor)
For the Raspberry Topping:
- 2 cups (250g) fresh or frozen raspberries
- ¼ cup (50g) sugar
- 1 tablespoon cornstarch
- 2 tablespoons water
- 1 teaspoon lemon juice
Optional Garnishes:
- Fresh raspberries
- Whipped cream
- White or dark chocolate shavings
- Mint leaves
Instructions
Step 1: Prepare the Crust
- Crush the biscuits – Use a food processor or place the crackers/biscuits in a sealed ziplock bag and crush them with a rolling pin until fine crumbs form.
- Mix with butter – In a mixing bowl, combine the crushed biscuits with melted butter and sugar (if using). Stir until evenly coated.
- Press into pan – Transfer the mixture into an 8- or 9-inch springform pan. Use the back of a spoon or a flat-bottomed glass to press it firmly into an even layer.
- Chill – Place the pan in the refrigerator for 15–20 minutes while preparing the filling.
Step 2: Make the Raspberry Topping
- Cook the raspberries – In a saucepan over medium heat, add raspberries, sugar, and lemon juice. Stir occasionally until the raspberries break down (about 5 minutes).
- Thicken the mixture – In a small bowl, mix cornstarch with water to create a slurry. Slowly pour it into the raspberry mixture while stirring constantly.
- Simmer & cool – Let the mixture cook for another 2–3 minutes until it thickens slightly. Remove from heat and allow it to cool completely before using.
Step 3: Make the Creamy Filling
- Beat the cream cheese – In a large mixing bowl, beat softened cream cheese, powdered sugar, vanilla extract, and lemon juice until smooth and creamy.
- Whip the cream – In a separate bowl, whip the heavy cream until stiff peaks form.
- Combine – Gently fold the whipped cream into the cream cheese mixture, being careful not to deflate the air.
Step 4: Assemble the Cake
- Spread the filling – Take the crust out of the fridge and spread the creamy filling evenly over it using a spatula.
- Add the raspberry topping – Gently spoon the cooled raspberry mixture over the cream layer, spreading it evenly.
- Smooth the top – Use the back of a spoon or an offset spatula to create an even layer.
Step 5: Chill & Serve
- Refrigerate – Cover the cake with plastic wrap or foil and chill for at least 4–6 hours (or overnight for the best results).
- Remove from pan – Once set, carefully release the cake from the springform pan.
- Garnish & serve – Decorate with fresh raspberries, whipped cream, mint leaves, or chocolate shavings. Slice and enjoy!
Notes
- If using frozen raspberries, make sure to thaw and drain them well before cooking to prevent excess moisture.
- For a gluten-free version, use gluten-free biscuits or almond flour mixed with melted butter for the crust.
- To make it vegan, replace cream cheese with a dairy-free alternative, use coconut cream instead of heavy whipping cream, and vegan butter for the crust.
- Let the cake chill overnight for the best texture and easiest slicing.
- For cleaner slices, dip your knife in warm water and wipe it between cuts.
- Prep Time: 20 minutes
- Cook Time: 5 minutes (for the raspberry topping)
- Category: Dessert
- Method: No-bake
- Cuisine: American, European
Nutrition
- Serving Size: 1 slice (based on 10 servings)
- Calories: ~320 per serving (varies based on ingredients and portion size)
Keywords: No-bake raspberry split cake, raspberry cheesecake, no-bake dessert, easy raspberry cake, no-bake summer dessert